
Adding Shine To Your Projects


Adding shine to your projects adds elegance to your design 


There is something about cards that have a little glitter or shine that make them extra special. In my journey as a Altenew Educator, I am learning how to apply some shine to my greeting cards. And the same techniques apply to other paper crafts too. 

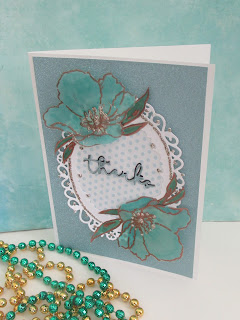
Let's start with the flowers. Creating flowers that shine include using die cuts and embossing powder. You can emboss vellum with an embossing powder like gold, copper or any other metallic powder that you like. Make sure to use a powder tool to get better results. 

Once you have embossed the flowers, it's time to add some color. With the vellum, the best results will be by using alcohol markers. Chose two colors in the same color family. Color the flowers and set them aside to dry.

My recommendation on these flowers would be too fussy cut them rather than die cutting. If you used a die, you may lose some of embossed detail.

You could also use some watercolor paper. Emboss that with the same metallic embossing powder. Then color the flowers with watercolors.

In all of these examples, I have used nesting dies to create layers on the cards. Nesting dies are great to use when you want to have a base to add some shine. 

You shine can be in the embossing, using metallic beads, using metallic markers, Using metallic paper and metallic markers. Another of my personal favorites is to use metallic glue drops to add even more shine.

My three examples are showing you how to use the Fresh Bloom stamp set to create these amazing flowers. This set can be used in so many ways, you will find yourself going back to it often. You can use it as a single or double flower. There are leaves to the set and more. I love the delicate petals in this set. There are also layers in this set, so you can layer these flowers as well. They are a very versatile set.


         Supplies Used For This Project


Fresh Bloom Stamp Set
Blue Glitter Paper
White vellum
Alcohol Markers in the same color family
Blender Brush
Foam tape
Foam dots
Nesting dies
Cardstock
Glitter Glue
Half gold beads
Patterned paper
Tacky glue

Lots of these supplies you probably will have in your personal stash. If not, they are all reasonably priced. We have included some of these at the bottom of the post. While we may earn some commission at no cost to you, they are used to enhance his community


  • Turn up the shine on die cut glitter elements by adding a layer of Glossy Accents over the top.
  • Clean it up. Before heat setting your embossing powder, use a dry brush to sweep away any stray pieces of embossing powder. These little specs will expand as they heat and turn in to blobs. Quickly brushing away strays will give you great results every time.
  • Once you’ve placed your embellishments, take a step back, and look at your project. Then listen to your gut. Does it feel right? If not, make a small adjustment. I’m a firm believer in going with your gut. It’ll lead you in the right direction.


We hope that we have inspired you to add some shine to your next greeting card projects. I guarantee you will get a lot of satisfaction when you do.

Until next time, Happy Crafting!

Linda


Supplies To Add More Shine 


Comments

Post a Comment

We would love to hear your thoughts, ideas, or just say hello. We appreciate your time here today. Thank you for stopping by!

Popular posts from this blog

Beyond Basic Backgrounds

Today we are exploring back grounds for greeting cards using stamps and coordinating dies with embossing powders to create a totally different look. Welcome to another community tutorial as I take my journey through the Altenew Educator Class. I have to say that I love the soft look of these greeting cards.  For this technique you will need a stamp set with the coordinating dies. You will actually create a stencil using the dies for the image that you are using on your background. To create this stencil, you will want to use a heavy white cardstock, at least 90 Lbs. or more. That way, you will be able to use the stencil again. You also will want to make the stencil a bit larger than the actual card base. Overlapping will give you the best results. Creating The Stencil Supplies White cardstock at least 90 lbs. in weight Coordinating die for the stamp you are using. Low tack tape Die cutting machine and plates. Cut the piece of cardstock slightly bigger than the card base you will be...

What It Takes To Create An Advanced Ink Layering Technique

Today we are sharing with you some advanced ideas and techniques in ink layering. We are also sharing some additional ideas to help you take your greeting cards to the next level. We are featuring a new tutorial as part of my Level Three accreditation in the AECP (Altenew Educator Certification Program). This is a program that I have been working through for some time. My goal has been to be able to learn and share with you the best ideas and techniques to help you be the best paper crafter you can be.  There are actually 5 levels of layering classes in this program. The project that I am focusing on is a more intricate stamp set called. Climbing Clematis.  There are actually 6 layers to the main flowers and several layers to each of the coordinating flowers. The coordinating flowers add a natural touch to the design.  Here are some of the techniques that I am focusing on for this tutorial: All About Layering 1-5 All About Layering Dies Edition Layering Guides Layering gu...

Creative Coloring-Watercolors -Stencils-Embossing Paste-Part 1

  So, today we are talking about some creative coloring techniques that will add some texture and color to all of your greeting cards. Although it is considered an advanced technique. you can create these cards with a little practice.  We have two different techniques for you in this series.  Part 1 has the stencil with embossing paster as the medium. It used a white embossing powder which is then colored with watercolors. This has a grungier look. Part 2 uses the same stencil, with embossing paste, but this time we are using iridescent glitter instead of embossing powder. This one has a totally different look as the watercolors soak into the glitter.  All of the cards that we are showing today use a single stencil with some variation in the materials and colors used. The stencil that we used is the Mega Bloom Stencil from Altenew. This stencil has a lot of detail and makes a definite statement no matter where you choose to use it/ Yes, it is terrific on a card, but ...