

Zentangle Quick Tips


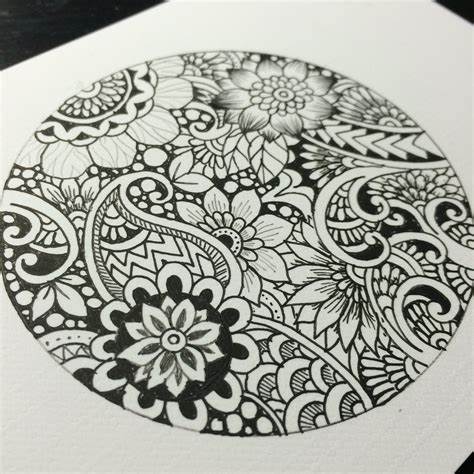
Zentangle is an easy way to create beautiful images with structured patterns. Each pattern is called a tangle.You create tangles with combinations of dots, lines, simple curves, S curves and orbs. 

Patterns that are drawn on small pieces of paper are called tiles.


Starting With Zentangle

  1. Every zentangle starts the same way. You put one dot in each coner of your paper.
  2. Connect the dots with a pencil making a straight or curvey line. This square creates your frame or border
  3. Within the frame, make a line or several lines within the frame. This lines are called strings. Your strings should go from one boarder to the other
  4. Within those strings, you design your tangle or pattern
  5. Tangles are drawn with pens within the strings 
  6. Add shading to your tangles with a graphite pencil. This adds dimension to your piece.


Zentangle Tips

  • Fine tip pens work best. If you want to add color to your art, then you can use fine tip sharpie pens & extra fine tipped pens
  • Instead of making grids with lines, you can outline a cup to make circle grids. Make sure to overlap the circles.
  • If you want to create a design on a full sheet of paper, start your design in the center of the page. That way you can leave the outside white as a border if it becomes to much to finish.
  • Vary your pattern designs by thin, thick, dark & light. That way youā€™ll have some depth & balance to your art.
  • Use shading to add dimension and depth to your tangles.


What To Do With Your Zentangle Art

  • Cut it up and make it into a greeting card
  • Frame it as a piece of artwork
  • Modge Podge them into coasters or on wood
  • Modge Podge them onto a plate
  • Use them in an art journal
  • Laminate them and use them as placemats or coasters or just weird surfaces to color on for your kids
  • Cut them up and collage them


Complete Guide To Zentangle Patterns
How To Make A Zentangle Step By Step
Tangle Patterns
Official List Of Tangle Patterns
Tips For Drawing Auras
Zentangle Tips
16 Zentangle Coloring Pages

Comments

Popular posts from this blog

Beyond Basic Backgrounds

Today we are exploring back grounds for greeting cards using stamps and coordinating dies with embossing powders to create a totally different look. Welcome to another community tutorial as I take my journey through the Altenew Educator Class. I have to say that I love the soft look of these greeting cards.  For this technique you will need a stamp set with the coordinating dies. You will actually create a stencil using the dies for the image that you are using on your background. To create this stencil, you will want to use a heavy white cardstock, at least 90 Lbs. or more. That way, you will be able to use the stencil again. You also will want to make the stencil a bit larger than the actual card base. Overlapping will give you the best results. Creating The Stencil Supplies White cardstock at least 90 lbs. in weight Coordinating die for the stamp you are using. Low tack tape Die cutting machine and plates. Cut the piece of cardstock slightly bigger than the card base you will be...

What It Takes To Create An Advanced Ink Layering Technique

Today we are sharing with you some advanced ideas and techniques in ink layering. We are also sharing some additional ideas to help you take your greeting cards to the next level. We are featuring a new tutorial as part of my Level Three accreditation in the AECP (Altenew Educator Certification Program). This is a program that I have been working through for some time. My goal has been to be able to learn and share with you the best ideas and techniques to help you be the best paper crafter you can be.  There are actually 5 levels of layering classes in this program. The project that I am focusing on is a more intricate stamp set called. Climbing Clematis.  There are actually 6 layers to the main flowers and several layers to each of the coordinating flowers. The coordinating flowers add a natural touch to the design.  Here are some of the techniques that I am focusing on for this tutorial: All About Layering 1-5 All About Layering Dies Edition Layering Guides Layering gu...

Create Metallic Stripped Card-Everything You Need To Know

  Have you ever considered using metallic embossing powders in an entirely different way to create a custom card that will long be treasured by the recipient of this wonderful art form? I was super impressed by this technique in a recent class that I took at Altenew on Progressive Card Making. I have always enjoyed using embossing powders. Using them has been a passion of mine. As you see the powder heat up, and the magic happen, it brings joy to your papercrafts. I made three thinking of you cards and one thanks card. But honestly, you could use any large sentiment die that you have for this technique.   One Note Before We Get Started It is often said that "quality matters!" In this particular technique, it actually does! I tried different metallic embossing powders from different sources. and the one that worked the best was from Altenew. I did get better results with the antique metallic powders than I did from others in my stash, The closest to quality was the Wow embossi...