I don't know about you, but many of the card makers that I speak to feel challenged when they need to create masculine cards. It is always easy when we are making cards for the girls and ladies. So much to choose in design. But with the guys when you take away all the flowers, butterflies and girlie stuff, there does not seem to be a lot left.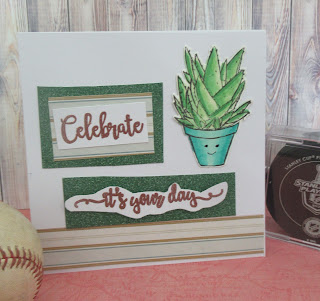

When I found this stamp set, I was excited, because I knew that I would be able to use it for my guy cards and a lot more. The set is called Succulents. besides having three arrangements to choose from, there are also some lovely sentiments that could be used year-round. Or you could use these for other occasions. I will be making thinking of you, get well cards as well as sympathy cards. So, this is one set that will get a lot of use. In addition, there are dies available for the set that makes it easy to get good images every time. I am also planning on using them in my journals and scrapbook pages too.
I really like the detail in this set. I added the little smiley face for fun since this was a birthday card.
You can color the images with just about any media as long as you stamp them with Momento or Stazon ink. For any water media, make sure to use watercolor paper as I did.
Because the Altenew Crisp Inks will work with water, I chose to use them to color the cactus on my card, The colors that I used were Frayed Leaf, Just Green and Hunter Green on the plant. I used Seabreeze, Dew Drop and Teal Cove on the planter.
I worked the cover of the card on a piece of cardstock. I cut the cardstock about 2 inches. Then I mounted the paper strip to the back of the card. Once all the trimming s were added on, I mounted that piece to a 6" by 6" cardstock base. That way, the card mounting was not visible.
The second sentiment was mounted with foam dots to give the card some dimension.
I hope that this idea gives you some ideas how you can use something simple to create your own masculine cards.
Tips For Making Masculine Greeting Cards
Keep The Design Clean And Bold
To make a card more masculine, make sure to use strong lines and geometric shapes. Avoid anything lacy or floral. Go for simple, uncluttered designs. se texture to its best advantage. Woodgrain, leather, metal foil and some kraft paper always works well. Embossing folders work well to give you the texture that you need.
Choose A Masculine Color Palette
Try to use earthy tones as well as rich and muted tones
Neutrals like grey, deep blue, tan and brown works well. Keep your accents and embellishments in colors that are like deep red, forest green, mustard, copper, and steel blue.
Use Themed Images

When you are using images on your designs, stick with his interests and hobbies. You could also use images that relate to his job or profession.
- Sports-golf, fishing, cars, biking, football, etc.
- Outdoors- mountains, trees, camping gear, tools.
- Modern Design- abstract art, typography, tech motifs.
- Retro/Vintage-classic cars, old maps, record players, typography prints.
Focus On Fonts
The fonts (type of print style and size) make a difference. Use bold sans-serifs or slab-serif fonts. Avoid curly and script type fonts. Try to mix a bold font with a clean font for clarity and readability.
Message Matters
When adding a message on a masculine greeting card it is important to keep it short, sincere and witty. The tone should be consistent with your personal relationship to that person.

Add Interactive Or Dimensional Elements
Use pop-up layers, metallic embossing, or die-cuts (like a gear, car, or mountain shape). Add fabric, leather, string instead of ribbon or fabric elements. Incorporate handmade textures: wood panels, denim scraps, or cork.
Personalization Means A Lot
Include names, initials and/or a favorite quote in your design. Mention a shared memory or an inside joke or saying.
.
.png)
Thank for stopping by today. We hope that you will give some of these suggestions a try. Drop a comment and let us know that you were here. We always love hearing from you.
Till next time, Happy Crafting!
Linda
Thats an adorable potted plant! How cute is that smiley!
ReplyDelete