 |
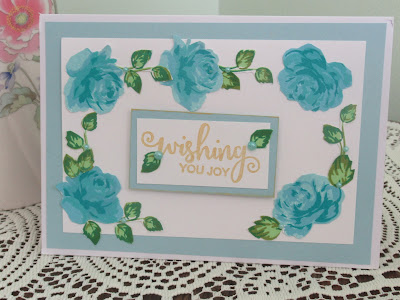
| The Vintage Roses Stamp set makes layering easy and fun! |
Today is all about my journey as I explore new options and techniques in the All About Layering 2 class in the Altenew Educator Program.
First, let me tell you about this amazing stamp set that I used for my class participation project. As with all of the Altenew stamp sets, this one comes with a layering guide. The layering guides that come with the Altenew stamps help you define the placement of each layer. There is a lot of joy in watching each layer come to life.
That makes it easy to go far beyond what you may have thought possible with stamping amazing flowers.
The Stamp Set
This particular set has become one of my favorites. Not only does it have several options for the flowers, but it has a lot of options for the leaves and how to use them with the set. It also comes with rose buds that I used with my second card.
Card Stock Used
The cardstock for this project was Ninah Solar white in 90 lb. weight. They were cut into 5' by 7" bases with my paper trimmer. I used a bone folder to make the creases crisp.
Stamping Platform Trick
The layering guide that comes with your stamp set or is printable on the Altenew website, gives you all the information you need to get the perfect results with an acrylic block. In combination with the Altenew dye inks, your stamped images will be just fine once you give it a little practice.
A stamping platform does make it easier to use layered stamps. Here is a trick I learned in a recent class. If you are using a MISTI platform there is an easy way to get perfect layered stamped flowers.
Inks I Used
As you are creating these realistic images, the main thing to remember is to stay within the same color family for the best results. I used Altenew Crisp Dye Inks on these projects. The colors were juicy and created nice layers. The corresponding dies do make it easier to get perfect cuts. But if you have a good pair of detail scissors, you will do just fine.
On the blue card, the flower colors that I used were:
- Frosty Pink
- Pink Pearl
- Coral Bliss
- Purple Wine
The Leaves were done in:
- Frayed Leaf
- Moss
- Hunter Green
I love to create dimension in my cards, so some of the flowers have adhered with foam dots. And it always makes a card special when you use foam tape to raise the pieces off of the card base.
If you like to add dimension to your cards, there is an additional die set that goes with this item.
I am definitely looking forward to working with the Vintage Roses stamp set in some additional colors. I can see some yellow roses, red roses, and maybe even purple roses in the near future.
I highly recommend that you expand your boundaries and give layering a try. Once you know some basics, you will find your creative juices will take you farther than you thought possible.
To get more information about the Vintage Roses Stamps and Dies as more information, click here
Till next time, Happy Crafting!
Linda


Comments
Post a Comment
We would love to hear your thoughts, ideas, or just say hello. We appreciate your time here today. Thank you for stopping by!