 |
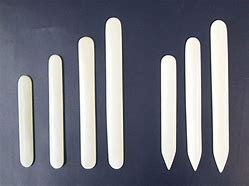
| Bone folders come in different shapes and sizes |
A bone folder is most often used to create creases in papercraft. It can be used with a ruler to create sharp creases on any paper you may have. Using a bone folder rather than a finger press will [recent any paper cracking in the fold. This often happens, especially on heavier paper.
Bone folders are also used in origami (the art of paper folding) to get crisp edges.
This tool is long, narrow, and flattened with rounded edges for a comfortable grip and no marks left on your paper. Most bone folders are 5-8 inches.
The old tried-and-true “basic” bone folder (traditionally made of animal bone –the way old-fashioned bookbinders have been for using them for centuries) has two ends with specific purposes. One end is narrowed to a softer point, which makes them great for deep scoring of heavy-weight paper and indenting for marking on book board. The tip can be sanded to the desired roundness depending on the project.
The second version is the newer Teflon bone folder. Teflon bone folders are more flexible than regular bone folders and won’t leave a sheen or scuff paper or book cloth. The great thing about the Teflon finish is: glue will not adhere to it.
Creating A Basic Crisp Crease
When you want to create a crease for the edge of a card base or other creases, the procedure is very simple.
- Fold the paper you are creasing over but do not crease it.
- Hold the paper in one hand and the bone folder in the other hand
- Press the tip area of the bone folder on the edge of the paper
- Applying pressure, run the bone folder across the edge of the paper.
- Repeat the edge again and you will have a perfect crease

Creating Score Lines
An assortment of tool options can be used with the bone folder to score a straight line. Take a look at the three standard options below.
- With A Ruler-A ruler can be used to create nice, straight score lines. One benefit – you probably already have a ruler in your home! \
- With A Trimmer-A paper trimmer can be used with a bone folder to create a score line, You will want to line up the score mark over the cutting track groove
- With A Scoring Board-The, scoring board is perfect when you need to make multiple lines
How To Create Scoring Lines
- Choose a coordinating tool-First get a ruler, trimmer or scoring board to use with the bone folder
- Line the paper-Next, line up your paper with the tool so that your scoreline will be in the appropriate location. For creating standard A2 sized cards, which are exactly 1.2 of a sheet of 8 1/2" by 11 " cardstock, your score line will need to be exactly 4 1/2"
- Score it-Place the bone folder against the paper in the appropriate groove or along the side of the ruler at the very top. Press down with moderate pressure as you slowly move the bone folder downwards to the bottom of the paper. Be sure not to press too hard or you could tear the paper.
How To Use A Trimmer To Score A-Line
\
I hope that this tutorial helps you get better and crisper scorelines

Till next time, Happy Crafting
Linda
Comments
Post a Comment
We would love to hear your thoughts, ideas, or just say hello. We appreciate your time here today. Thank you for stopping by!